Artwork Guidelines & Tips
When submitting artwork for print, to ensure your design is printed correctly, your artwork must adhere to the following guidelines.
General Guidelines
Bleeds – include 1/8” (0.125”) bleed on all sides (0.25” additional height and width)
Safe margin – 0.125” safety margin (inside trim line)
Resolution for placed images should be 300dpi or higher (at 100%)
Embed source image files
CMYK colour mode
Convert fonts to outlines
Export as PDF file (preferred)
** Please do not provide art tiled in multiples (i.e. 6-up on a sheet). Please send artwork as individual files (a single PDF with two pages – page 1: front; page 2: back – is preferred) *
Accepted file Formats
PDF is our preferred file format, however, we also accept Adobe Illustrator (AI), Encapsulated Postscript (EPS), Adobe Photoshop (PSD), TIFF and JPG/JPEG. Where possible, designs featuring graphics or text should be submitted as vector based PDFs.
** Please note that files submitted in Word (DOC, DOCX), Microsoft Publisher (PUB, PUBX), Adobe InDesign (INDD), Quark (QXD), or CorelDraw (CDR) may be subject to additional set up fees. If you are using these file types you will need to export a press-ready PDF file. **
HELPFUL TIP: Detailed naming of your files will help us process your order quicker (i.e. “Yourname_BizCard_Front.pdf” and “Yourname_BizCard_Back.pdf”)
Proofing
ALWAYS be sure to check your document carefully for color quality, accuracy and layout prior to uploading. Proofreading is the responsibility of the customer, and can save you time, money and frustration. While we make every effort to ensure that your document(s) is accurate, we are unable to thoroughly inspect every file we receive. It is imperative that you check spelling, contact details, punctuation, pricing etc. before submitting your art as we cannot issue a credit or re-print later.
Design Terms Explained
Bleed:
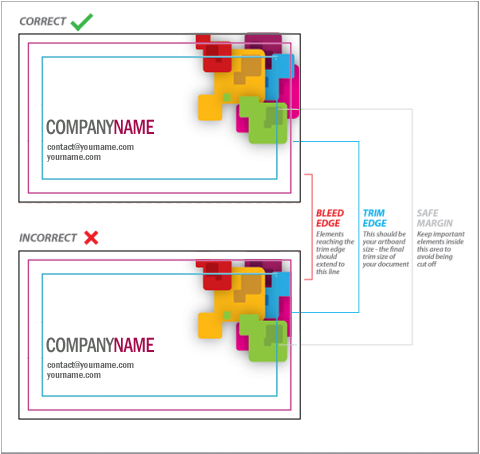
When any image or element on a page touches the edge of the document, extending beyond the trim edge, it is said to bleed. It may bleed or extend off one or more sides. To prevent an unwanted white border from showing at the edge of your document when trimmed, be sure to extend any background colors or design elements all the way to the bleed edge (0.125” past the trim edge). Please do not use crop marks, as they are not compatible with our upload process.
Safe Margin:
Just as images that should bleed should extend beyond the live area of your layout, images that you don’t want to risk getting clipped should stay within a margin, referred to as a “safety.” Please keep all important elements like names, addresses, phone numbers or logos at least 0.125” inside the trim edge to ensure that they aren’t cut off when your document is trimmed.
Raster vs. Vector Graphics:
Raster images are composed of several tiny dots called pixels; together they form a single image. Raster images are ideally used when gradations of color are necessary. Because they contain a fixed number of pixels (said to be “pixel-dependent”), a disadvantage of raster images is that their quality suffers when they are enlarged. They are also large in file size. Images displayed on the web are all raster images.
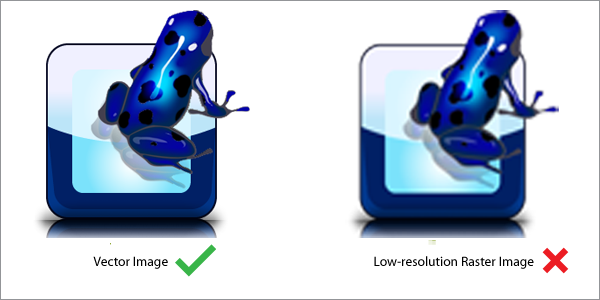 When possible, use vector graphics created in a desktop publishing program. Vector images are different from photos because they use mathematical equations to define each component of the image (they are said to be “pixel independent”). Vector graphics are scalable and retain their crisp high image quality at any size. Vector images should be used for all text and logos, if possible.
Convert Text to Curves:
Text can be converted to curves (paths) in some graphics programs. This will fix upload errors that result when fonts cannot be embedded in your file. In Illustrator, you can simply select the font and then use the Create Outlines command (Shift+Control+O) or select from the menu Type > Create Outlines. Following this easy step will help ensure that your text prints clearly and will not be inadvertently re-formatted using a different typeface.
Design in CMYK:
Computer monitors use a different color definition (RGB) than that used by professional printers (CMYK). In order to ensure the most accurate color reproduction, you should convert your document to use the CMYK color space. If your software allows, use “CMYK: Web Coated (SWOP) V2” to see the most accurate representation of the final printed colors.
How to Check Color Settings in Adobe® Products:
INDESIGN
1. Go to the Edit Menu and choose “Color Settings”
2. Make sure you are in Working Space: CMYK: ‘U.S. Web Coated (SWOP) v2’. The RGB value will not affect your design.
To change color settings:
1. Go to the Edit Menu and choose “Convert to Profile”
2. Change the Destination Space to CMYK: ‘U.S. Web Coated (SWOP) v2’ and click OK.
PHOTOSHOP
1. Go to the Image Menu and choose “Color Mode”
2. A check mark will appear next to current color mode
3. Select CMYK Color
ILLUSTRATOR
1. Go to the File Menu and choose “Document Color Mode”
2. A check mark will appear next to current color mode
3. Select CMYK Color
If you experience difficulties and need assistance with your artwork preparation, please contact us at 416-364-9762.
File Resolution
The higher the resolution, the better the picture quality, but don’t go too far. The best rule we suggest is create your artwork at 300dpi at final size. Often you don’t have control of your image resolution because it is determined by the setting when the image was originally captured.
If unsure, please contact us at 416-364-9762.
Font Handling
Although we carry thousands of licenced fonts, we may on the rare occasion be unable to match exactly with your special request. Therefore, we recommend that you outline or embed your selected fonts within the program you use to create your finished artwork. This way we can print them as you intended them to appear.
Page Files
If multiple pages are required, it is critical that you supply each page as a separate print ready PDF in page sequence. DIGITIME will prepare the imposition based on the number of pages and the sequence they are supplied. i.e.:
• Double sided postcard (front & back) – supply a two page print ready PDF file.
File names
Keep it simple and relevant and avoid symbols. Use only alpha-numeric characters and try to keep it short. Using an underscore _ is acceptable to assist with identifying the job title and end product.
Example:
• Double sided postcard – File name: XPLOR_DBL_postcard.pdf
• Single sided business caed – File name: DJ_businesscard.pdf